Install RedHat Deployment of OpenStack using Packstack.
Packstack is a wrapper over a collection of Puppet manifests that install a specific release of OpenStack
Prerequisite’s
A virtual Machine with CentOS 7 Minimal with the following configurations:
- at least one NAT network
- at least one Host-Only network
- 8GB+ RAM
- 50GB+ disk space
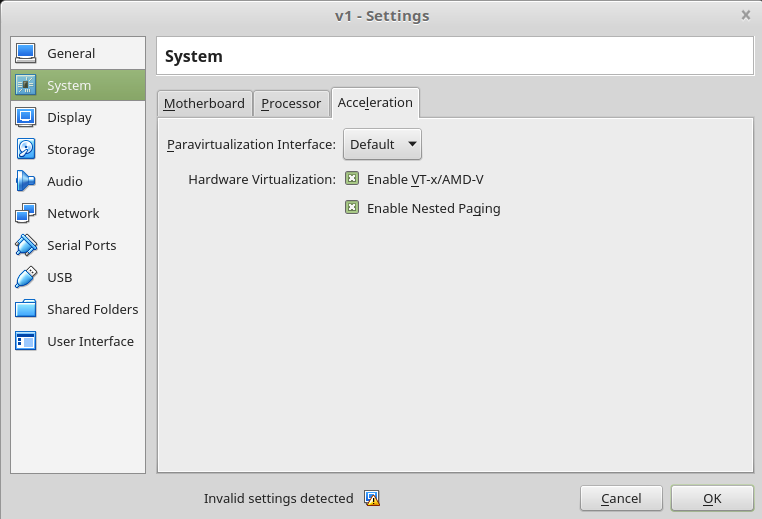
- enable nested paging
- enable VT-x/AMD-v
You can follow this article to prepare it.
To enable support for vitalization (nested paging and VT-x/AMD-v) you can go to:
Settings -> System -> Acceleration
Conventions
When you have successfully booted the VM you should have at least two network interfaces:
enp0s3corresponding with the NAT networkenp0s8corresponding with the Host-Only network
We will use the NAT network for internet access to our VM and also internet access for OpenStack networking. The Host-Only network will be used to connect to the VM.
Furthermore, I’ll assume the following conventions:
enp0s3has the CIDR10.0.2.0/24and the DHCP assigned IP was10.0.2.25enp0s8has the CIRD192.168.99.0/24and the DHCP assigned IP is192.168.99.25
Install Packstack and prepare the system
This process follows the steps form the (RDO website)6.
Setup Networking
We need to disable the Network Manager from CentOS and configure a static IP for both interfaces
Disable Network Manager
Run the following commands
~ $ sudo systemctl disable firewalld
~ $ sudo systemctl stop firewalld
~ $ sudo systemctl disable NetworkManager
~ $ sudo systemctl stop NetworkManager
~ $ sudo systemctl enable network
~ $ sudo systemctl start network
Setup static IP
Because we disabled the Network Manager we can’t use (nmcli)7 to configure network interfaces.
We will have to rely on the classic network scrips found in /etc/sysconfig/network-scripts/
You can use vi or nano to edit the configurations.
For the NAT network the configuration (found at /etc/sysconfig/network-scripts/ifcfg-enp0s3) should look like this:
TYPE=Ethernet
PROXY_METHOD=none
BROWSER_ONLY=no
BOOTPROTO=static
DEFROUTE=yes
IPV4_FAILURE_FATAL=no
IPV6INIT=yes
IPV6_AUTOCONF=yes
IPV6_DEFROUTE=yes
IPV6_FAILURE_FATAL=no
IPV6_ADDR_GEN_MODE=stable-privacy
NAME=enp0s3
UUID=<uuid>
DEVICE=enp0s3
ONBOOT=yes

IPADDR=10.0.2.25
NETMASK=255.255.255.0
GATEWAY=10.0.2.2
DNS1=8.8.8.8
DNS2=8.8.4.4
For a better understanding I’ll explain the required changes:
BOOTPROTO=static this was changed from DHCP, it means we want to set up a static IP not to
ask a DHCP service for one;
ONBOOT=yes this device will be activated at boot time;
IPADDR=10.0.2.25 what IP address we want to use. Notice this is in the same range
we assumed in the Convention section.
NETMASK=255.255.255.0 the netmask for our network. Notice this is in the same /24
we assumed in the Convention section.
GATEWAY=10.0.2.2 what gateway to use in our network, .2 is the default in VirtualBox.
We configure the DNS to use the ones provided by google.
More information about the network scripts can be found on the centos website.
For the Host-Only network the configuration (found at /etc/sysconfig/network-scripts/ifcfg-enp0s8) should look like this:
TYPE=Ethernet
PROXY_METHOD=none
BROWSER_ONLY=no
BOOTPROTO=static
DEFROUTE=yes
IPV4_FAILURE_FATAL=no
IPV6INIT=yes
IPV6_AUTOCONF=yes
IPV6_DEFROUTE=yes
IPV6_FAILURE_FATAL=no
IPV6_ADDR_GEN_MODE=stable-privacy
NAME=enp0s9
UUID=<uuid>
DEVICE=enp0s9
PREFIX=24

ONBOOT=yes
IPADDR=192.168.99.25
NETMASK=255.255.255.0
GATEWAY=192.168.99.2
The same parameters as the NAT network were configured. We only omitted the DNS, this network has no Internet Connectivity
and DNS settings are not required.
To find more about networking in VirtualBox you can read this article.
Now you need to apply the configurations to both interfaces:
~ $ sudo ifdown enp0s3
~ $ sudo ifdown enp0s8
~ $ sudo ifup enp0s3
~ $ sudo ifup enp0s8
Now you should be able to connect to the instance
Setup SSH
You need to install the SSH server
~ $ sudo yum install -y vim openssh-server
~ $ sudo systemctl start sshd
Now you should be able to connect with ssh to that instance.
From the Host machine (your laptop) try to connect with ssh to that instance:
~ $ ssh [email protected]
This ssh connection is more convenient to work.
Install Packstack
Install the OpenStack realizes you want and the packstack utility
~ $ sudo yum install -y centos-release-openstack-pike
~ $ sudo yum update -y
~ $ sudo yum install -y openstack-packstack
You can use any OpenStack realizes, I tested this with Newton(that is deprecated) and Pike.
Install Openstack
Simple All In One deployment
Now we provision the OpenStack cluster using Packstack on this instance with default services and configurations.
~ $ packstack --allinone --ntp-servers=pool.ntp.org
Using an answer file
You can generate an answer file with the following command:
~ $ packstack --gen-answer-file=~/answers-file.txt
If we look at this file we can see all the configuration used by the Packstack utility. Some configuration that might be helpful for a simple deployment might be:
CONFIG_SWIFT_INSTALL=n
CONFIG_CEILOMETER_INSTALL=n
CONFIG_AODH_INSTALL=n
CONFIG_GNOCCHI_INSTALL=n
CONFIG_HEAT_INSTALL=y
CONFIG_NTP_SERVERS=pool.ntp.org
CONFIG_NAGIOS_INSTALL=n
CONFIG_DEBUG_MODE=y
Run the utility with this settings
~ $ packstack --answer-file==~/answers-file.txt
Access Horizon
To access the OpenStack deployment you first need to allow access to httpd from the private ip.
Edit the file /etc/httpd/conf.d/15-horizon_vhost.conf and replace all occurrence’s of ServerAlias with just one ServerAlias *.
It should look like this (this is just the snipper)
...

  ## Server aliases
  ServerAlias *
  WSGIApplicationGroup %{GLOBAL}
  WSGIDaemonProcess apache group=apache processes=3 threads=10 user=apache
...
You can now access the dashboard using the private ip (in our example 192.168.99.25).
The credential can be found in one of the files keystonerc_admin or keystonerc_admin.
Troubleshooting
When the packer utility finishes, it will give you information about the status of the deployment and the location of the logs. It might look something like this:
ERROR : Error appeared during Puppet run: 10.0.2.30_controller.pp
Error: Execution of '/usr/bin/rpm -e mariadb-server-10.1.20-1.el7.x86_64' returned 1: error: Failed dependencies:
You will find full trace in log /var/tmp/packstack/20180422-164044-c2KzyF/manifests/10.0.2.30_controller.pp.log
You can usually fix the problem by installing/removing some package that has a problem or change some configuration in your
answer file. After you fixed the problem you can run the packstack command with the --answer-file parameter to install Openstack.
You can also run packstack in debug mode with the flag --debug.
You can list all the Openstack services with the following command:
~ $ systemctl list-units openstack-*